Showing posts with label Promarkers. Show all posts

Wednesday, 18 October 2017

BeeCrafty - Hochanda Samples for the 12th Oct.

Hey Bloggers..

Once again my turn to share some inspiration for
BeeCrafty

Today I was to share my samples from last weeks show (the 12th Oct) on Hochanda.
I love this collection of stamps as I love making backgrounds and just finishing my cards with a greeting.. And this collection fits perfect for that.

Find all the stamps and many more goodies over in the online STORE.

This was the very first sample I made.. I LOVE the circle art boards BUT I still dont have much confidence when it comes to the MDF.. I dont know why as its really just like working on a piece of card.. But this is what I can up with and the result is growing on me lol..

Anyway, its Lustre Luxe and stamping on stop. Use a waterproof ink to stamp on top of Lustre Luxe. I finished with a bit of Lustre Luxe through one of the Dinkables..

A MDF tag.. and more Lustre Luxe. and more Lustre Luxe through a Dinkable..

 
And more of the same.. MDF tag, Lustre Luxe, Stamping and more Lustre Luxe through a Dinkable..

This one got to be my favorite of my samples.. But if you know my crafting, you'll know how much I love using rainbow colours.. I simply stamped with the smallest circle from the set randomly around my card and coloured in with distress ink. My greeting is stamped with waterproof ink onto vellum. Make sure you leave your vellum well to dry, It takes time, but its worth it..

Using a vellum overlay for your greeting, means you can still SEE the background behind, but your sentiment takes pride of place.

Made just like above only using the little square stamp and a different sentiment.

And another one, only using the little heart, a different greeting and alcohol markers to colour in. 
As I used a cardstock not designed for alcohol ink markers, the colouring turned out a bit streaky. I thought of changing it, but I actually really like the effect it gave so decided to leave it.

Well I carried on along the same lines with this one. Only my satmping was more deliberate this time. I also used the middle square and then the smaller square inside. And instead of a vellum overlay, I heat embossed my greeting on to black card stock.

And then I finally changed gear lol.. This background is one I have tried before and I still love the result.. I used the harlequin stamp and simply lined up my stamping. I then did the mop up tecnique with some purple distress ink. I diecut the heart out and stamped my greeting strait onto my card blank before adding my background.


And then it was time for oxides.. It just had to be done lol..
I used various coulours through various Dinkables.. I sprayed a bit of water over my inks and that gave this card this dusty look. My greeting is stamped on a white piece of card and just cut out before sticking to my card.

And then this one came alive.. It was simply just me cleaning my Dinkables from the above card.. I just sprayed a bit of water onto the stencils and preiing the card onto the stencil.. I did it to all the Dikables and this is the result.. I then stamped a few of the wire border stamps and my greeting and voila..

For this one I used paste through a Dinkable.. I love this wee stencil and I thought it really lended it self to paste as the lines are sooooo wee. (small)
Once my paste was dry I once again did rainbow colours, once again using oxides, and finished woth water spalshes.


And last but not least..
My very first play with the Skylines.. Ohh these was lying staring at me while I made all the other samples.. And I was nearly scared of playing with them... I have never done anything like this card before and its sooo out of my comfort zone.. BUT I love the result..
I used the bridge stencil and made the bridge... I then cut out the bridge.. I then made my "sunrise" and added my buildings in the back. I then finished by adding foam tape on the back of my bridge and adding it to my card..

I could have added a greeting in the sky but to be honest I really liked it as is..
And that is all from me today. I hope I have given you a bit of inspiration for what you can do with your stamps.

Thank you for popping by and for any comments left behind.
Dont forget to come visit me on FaceBook, Twitter, Instagram, Pinterest, Youtube or my FB page.
 Happy Crafting


Friday, 23 June 2017

Graciellie Design - Inspiration (Coffee Loving Cardmakers bloghop)

Hey Guys..

If you have followed my blog this month, you will know I have been invited to be on the June guest DT for
Graciellie Design.

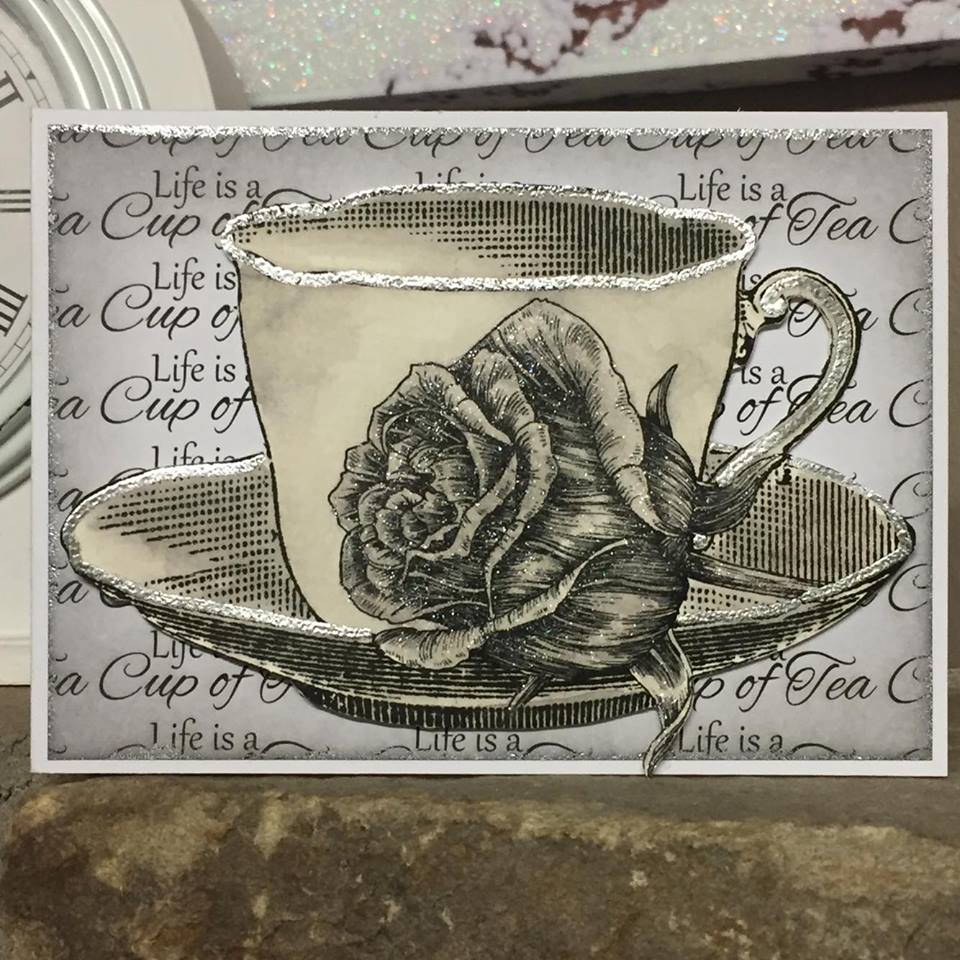
I have already posted my 3 project, but the team was asked if we would like to create an extra project this month using the amazing image called "Cup of Tea" and being me.. ohh I DO so love my tea, so I couldnt say no lol..

Graciellie Design is taking part in a blog hop this month over on Coffee Loving Cardmakers. We, the Graciellie DT is not part of the hop but Graciellie Design is and have massive prizes up on offer so us DT was asked if we wanted to make some supporting projects and help spread the word of the hop.


Here is what I have made:


I printed the tea cup image (twice) using word so I could resize it. I printed, coloured (I used Zig clean color real brushes) and cut out.
I then used my coloured image as a template and made another tea cup from white card stock and cut it out. I now have 2 teacups the same size, but one is white, the other my coloured image. See images below on how I stuck the 2 sides together.

Now my second image I printed.. I coloured the rose head and fuzzy cut it. I then added it on top of the rose head on my card and finished with a bit of shimmer pen over.
My sentiment I also printed but desided to add it more as a price tag to the handle of the cup, that way it wont cover the rose.

I made a little tab out of white card stock to add the 2 cups together.
 In order to open the card, I had to cut a wee bit of the white cup. This way the coloured cup will just pop around the back of the white cup when you open.


 Now this project.. Well long story short.. Printing in the wrong size = too many printouts for 1 card.
As I had them printed after making my original card above, I thought I might as well play with this as well. I coloured with Zig Clean colour real brush markers and all I added was shimmer over the rose.
The background is made by simply copy and pasting my sentiment MANY times till I had a full sheet covered. I printed and cut to size, added a bit of distress ink and Voila... Very simple card.

 
 Now I HAD to share this creation.. No its not mine lol.. This is my test print I did on copy paper.. My 6 year old Abbie, asked if she could have it and colour it in. I couldnt say no. And she was so proud of it I had to promise to show it off. I think she did a great job.

 
Now last pic.. This was really a mistake..Well I coloured the whole image in but I went to add glossy accent over the whole image and it screwed up the tea cup itself.. The rose came out well, so I cut the rose out and now have it for another project.

nd that is all from me today. Thanks for popping by and for any comments left behind.
Dont forget to come visit me on FaceBook, Twitter, Instagram, Pinterest, Youtube or my FB page.
 Happy Crafting


Thursday, 15 June 2017

Graciellie Design, 2nd bloghop for June..

Hey Bloggers..
I have been chosen to be part of the guest DT for June for 

Im taking part in the New Release Blog hop that the team does and with a prize of $10 for the Etsy shop, its well worth it. Its time for the second hop of the month. Hope you will join in.

Here is the order in which you need to jump round. And dont forget to leave a comment on each blog to be in with a chance to win. Good luck.
Graciellie Design
Arjita
 
 María Pilar
Shylaa Shree
 Ginny
Gayatri
Agnieszka
Barbara


Guest Designers:
Shilpa
YOU ARE HERE: Marleen  

 I have once again used the brand new digital stamp set called "Wonderful Things"
Find it in the Etsy Shop
Here is what I have made for this time:
  
 This card is using the "standard" method of setting up a card. Background, layered mat, image and greeting below. Its quite a standard way for many of us to make a card, but I think we do it, cause it works so well. The images from Graciellie Design are so beautiful and detailed. Many people thinks that detailed images are are to colour, but in fact, they are far easier as the designer has added all the shading for you. All I had to do, was to add a bit of colour... Voila..
My background is made with distress ink, and I used promarkers to colour my flowers.

And that is all from me today. Thanks for popping by and for any comments left behind.
Dont forget to come visit me on FaceBook, Twitter, Instagram, Pinterest, Youtube or my FB page.
 Happy Crafting

Thursday, 1 June 2017

Graciellie Design New Release Bloghop..

Hey Bloggers..

Ohh I have exciting news to share this month.
I have been chosen to be part of the guest DT for June for 

Im taking part in the New Release Blog hop that the team does and with a prize of $10 for the Etsy shop, its well worth it. Hope you will join in.

Here is the order in which you need to jump round. And dont forget to leave a comment on each blog to be in with a chance to win. Good luck.
Graciellie Design
Arjita
 
Agnieszka
Ginny
Shylaa Shree
Gayatri
Barbara
María Pilar


Guest Designers:
YOU ARE HERE: Marleen  
Shilpa

 I have used the brand you digital stamp set called "Wonderful Things"
Find it in the Etsy Shop

Here is what I have made for this time:
  For this project I copied my strawberry image into Word. I scaled the image and copy & pasted the image to fill up an A4 sheet. I then printed the sheet and left it to dry overnight.
Digital images can always smudge a bit when you colour, but I personally find that leaving the images to dry overnight gives the ink enough time to set and I dont have that problem.
I used promarkers to colour and smudged a bit of distress ink around the images and edges.

I left this project very simple. I wanted the images to stand out. So all I did after my background was finished was to cut it to fit my card and added a mat and my sentiment.
My sentiment is also from the "Wonderful things" digi stamp set. I once again copied it in to word, re-sized and printed. I didnt leave this image for long cause I didnt colour it. I simply just fuzzy cut it and added a bit of distress ink.

What caught my eye when I first saw Graciellie Designs, was the Sentiments. Each digital set comes with several sentiments, and I love that. As I had the printer switched on, I printed this sentiment to have a play with. I love scrapbooking so I decided to make a fun background, a picture of my babies and some homemade glue drop to make this quick page.

And that is all from me today. Thanks for popping by and for any comments left behind.
Dont forget to come visit me on FaceBook, Twitter, Instagram, Pinterest, Youtube or my FB page.
 Happy Crafting