Showing posts with label Paints. Show all posts

Wednesday, 28 February 2018

BeeCrafty on Hochanda.. Banksy..

Hey Bloggers..

Sam from BeeCrafty was on Hochanda yesterday (Tuesday 27/02-2018) with some amazing goodies..
A huge selection of Banksy stamps, Background stamps, the Dinkables and some brand new MDF.

Sadly due to illness I had to sit this one out but as soon as I could drag myself out of bed I managed to get a few cards made and I thought I'd share some of them today.

 This one is made with a watercolour background, sparkle paste through the star Dinkable and using both sizes of the "Decision to try" stamp.

 This background is made with acrylic paint sprays, Sparkle paste, Lustre Luxe and the drop Dinkable. Sentiment "Dreams come true" is made the same way.

 
 This one is a Gelli plate background and then stamping with the Brick background stamp.
I used the "Girl watering Aerial" banksy stamp. The stamp was'nt wide enough to cover the bottom of my card so I inked up a bit of the base of the stamp and extended the "greenery". I finished again with the "Dreams come true" stamp.

 
Right last one for today.. This one is an A5 and the background is a "mop up" of Distress ink.
I used the Circle Inkable as well as the Heart Dinkable to create a bit of debth on my card. I once again used the "Dreams come true"sentiment and used the Banksy "Caught in the rain" stamp.
I extended some of the rain lines with a black pen as I wanted the girl and the sentiment to kind a flow together.
 
And that is it for today. Thank you for popping by and for any comments left behind.
Dont forget to come visit me on FaceBook, Twitter, Instagram, Pinterest, Youtube or my FB page.
 Happy Crafting


Wednesday, 31 May 2017

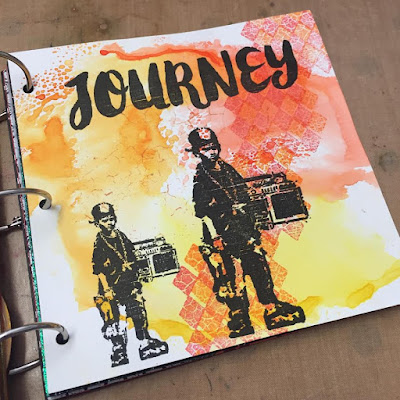
BeeCrafty Inspiration - Journal..

Good Morning Bloggers..

Once again wednesday and my turn to share a bit of inspiration for 

I was due to share my journal that I made for the last BeeCraft show on Hochanda, last week, but then the new Lustre Luxe landed and I HAD to make a youtube about them lol..
You can find it HERE if you want to watch it. 

So I decided to move journal to this week instead.. There is a lot of pics to share and i wont bore you with how I made each page. Hoever, If you have any questions, please just leave them in the comment section, or send me a message on Facebook. 

 I have used a selection of stamps, all from BeeCrafty. Find them HERE.
Ive also used several different mediums. Distress inks, embosing powders, paints, think a bit of crayon, stencils, stamps etc.. 

Some of the pages are just me having a play. Some pages I made fully and others was me trying out new tecniques to play with further at a later date.


  But that is all from me for today. Hope you have gotten inspired to go and have a play.
Thanks for popping by and for any comments left behind.
Dont forget to come visit me on FaceBook, Twitter, Instagram, Pinterest, Youtube or my FB page.
 Happy Crafting


Wednesday, 19 April 2017

Bee Crafty Inspiration .. Hochanda Samples

Hey bloggers and welcome to my my little slice of the www..

Once again wednesday and my turn to share some inspiration
for BeeCrafty.

I realised that I havent shared my Hochanda samples here on my blog after the last show. I just made the little video and shared but I want to talk you through how I made the projects, so that is what I will do today..

First of all, find the BRAND NEW STAMPS HERE.. 
They were released at the Ally Pally show, live on Hochanda and they sold out in record time. But the Bee Ladies have been working hard and have them back in stock in their shop..

 This one is made on one of the MDF tags. I primed it with white acrylic paint and used my distress ink to colour. I used the Heart Inkables to make the heart and I stamped also with distress ink, the border sentiment down the side. My Tulip,  I coloured with my Zig real brush water colour markers. I stamped the flower head 3 times and cut some of the details out to decoupage it. To make the stem shorter, I simply bent it and glued it. Finished with a bit of sparkle made with my wink of stella sparkle brush.
This one is made on one of the MDF Art Board Tags. I love these ad they can be made into free standing home decor. Ideal to make a wee pressie..
For this one I went strait on to the raw MDF with some sparkel sprays. Dont ask me where they are from as they were given to me by a friend and are so well used that you cant read the lable anymore lol... (Make your own sparkle sprays with rubbing alcohol and old eyeshadows.. I have you YOUTUBE HERE, that show you how)
Anyway, once my background was dry I went strait with my border sentiment stamp and stamped it repeatedly covering the whole board. I then took my Art journal border stamp and stamped each side of both the board and the stand. I used a black sharpie to colour in some of the design.
My Tulip I stamped onto black card and heat embossed with silver, cut it out and added on my board.

 
Oh I must say, I love this project myself... It took quite a long time to make but it was worth it.. 
Its made to be A5 in size.
For this I started by stamping my Tulip (that would be the front flower) I then made a mask of the tulip and lay that over my first flower, before stamping it again.. Once mask was removed, my back flower was revealed. I coloured them (I think it was with water colours) and stamped my sentiment.
I used chalk to create the shading of colour around the flowers.
 I then took some clear embossing powder and heat set it ALL over my image. It needed 2 coats to become totally smooth and now looks a bit like glass.
I then made my frame. I cut my card stock also to be A5, so same sice as my "glass pic". I then used a ruler and a craft knife (and quite a bit of measuring) to cut out the window.
Once cut I used the new dinkables and texture paste to make the design on my frame. Once paste was dry I used distress sprays to colour my frame.
Once dry, I added my frame over my image using foam squares.
 
 I wanted this to look just like a picture in a frame, so to be able to hang it up, I used a frame die to cut this "hook". I just cut of the end of the die cut and glues this bit on to the back of my picture.

 
 Another MDF tag, this one is the XL. This time with red acrylic paint background and orange acrylic paint through my swirl dinkable. I used the Journey stamp, stamped in black, but before the black ink dried completely I added some gold embossing powder. As the ink wasnt completly wet, the embossing powder didnt stick in all places so once I melted the powder, I got a very distressed look. I love how it came out. My Iris flower is stamped on white card stock, heat set also with gold embossing powder, coloured with water colours and cut out. I finshed the project with a bit of gold embossing powder around the edges and a black sharpie to outline my letters.

 Another Iris flower. this time on a card. Water colour back ground, plain stamping heatset with black embossing powder and the same with my border sentiment stamp. I made some black water splashes with a paint brush and black distress ink to finish the distressed look.

 
 This one was great fun. I did the maksing tecnique as I discribed earlier, and just repeat stamped my Tulip. I coloured them all in with water colour pencils and stamped my sentiment. I finished with some brown distress ink around the edges and a coat of glossy accent over the flower heads.

 This one was one of those projects we start but dont know how to finish.. I stamped my Iris
and coloured it in..I on purposely only wanted to use a piece of the flower to show that although its a big stamp, it could still be used on a smaller card.. But I was stuck.. In the end I HAD to get finished so I simply layered my stamp on to black and added it strait on to the card with foam. I took my  
Art journal border stamp and made the sides and finished with distress ink water splashes. I do love how it came out and a sentiment could easily be added.

 And that is it from me for today.
 Thanks for popping by and for any comments left behind. I hope you enjoyed these projects.
Dont forget to come visit me on FaceBook, Twitter, Instagram, Pinterest, Youtube or my FB page.
 Happy Crafting

Wednesday, 22 February 2017

February Hochanda samples for BeeCrafty

Hey Bloggers..
Thank you for popping by..

Today Im sharing my samples from Bev's recent show on Hochanda.
She introduced the FASHIONettes. Something a bit different then what Bev normally bring to Hochanda. But by god, did they go down a treat. I love these girlies and it was lovely to get back to colouring again. Something I dont do much of anymore.

Here is my samples from the show:

 A5 card
 Masking tecnique on canvas paper
 Mixed Media canvas Board
 Im not the only one who love these ladies.. My 6 year old, Abbie, loves joining me when my BeeCrafty stamps come out. She dreams of one day getting her cards on TV
 A5 card
 A5 card made with Brusho. I wanted to show that these girls CAN be used even if your not into/ new to colouring.
 6x6 card on distress background. I wanted to show that these girls CAN be used even if your not into/ new to colouring.
I also coloured in these girls and sent to Bev. They were simply as a back up for her if they were needed. Im no colourist and I mainly colour with water pencils. These girls are so easy to colour as each area is not too small and not too big. 

And that is all from me for today.
 Thanks for popping by and for any comments left behind.
Dont forget to come visit me on FaceBook, Twitter, Instagram, Pinterest, Youtube or my FB page.
 Happy Crafting


Wednesday, 8 February 2017

Hey Bloggers..
Back again with my Wednesday post for
BeeCrafty
.
 I missed last week due to circumstances out of my control but have a wee project to share with you for today.

For this week I have made a little wall hang. Its one those project I started a while back but just didnt know how to finish. I had the black MDF heart painted and the lace added but that was it.. 
It came together as I had pulled out a stack of unfinished projects, the heart lying on top, while I still had al my BeeCrafty goodies on the table.. And the 2 just merged together..

I love this saying from BeeCrafty..
"Life isnt about waiting for the storm to pass.. Its learning to dance in the Rain"
(Get the stamp HERE)
I often use this quote in my own life and something I try to teach my children.. Sometimes we really just have to get on with it, no matter what life throws at us"..

Anyway, very easy to make.. MDF heart, painted with crackle glaze, painted over with black. Lace and pearls added round the edge.
Sentiment stamped and heat set with black embossing powder before diecutting with a circle die. 
Few flowers added and voila.. all done..

And that is all from me for today.
 Thanks for popping by and for any comments left behind.
Dont forget to come visit me on FaceBook, Twitter, Instagram, Pinterest, Youtube or my FB page.
 Happy Crafting