Showing posts with label Distress ink. Show all posts

Wednesday, 15 January 2020

Colourific is going to Hochanda

Hello everyone
and welcome to my blog.

A very exciting post for me to share today.
COLOURIFIC IS GOING TO HOCHANDA
Im so excited to see Annelies and my teamie Alice demoing, and sharing with you all, the amazing stamps from Colourific.
They will be on Hochanda on Sunday 26th of January at 12 noon. 
Dont miss it :-)
(The new stamps wont be in the Colourific store till after the show, but do pop over and check out all the other amazing stams)

But let me share with you one of the samples Ive made for the show.
The stamps are amazing.


This one is a journal page and I used a couple of the new stamps sets for it. 
I used:

  • A5 Zen Ladies B
  • A6 Whispering Hearts

    I also used 
  • Jornal page
  • Distress inks
  • Distress Sprays
  • Distress Crayons
  • Tim holtz Stencils
  • Clear paste
  • Mister with water
  • Diecut Sentiment
  • Gilding wax
  • Archival black ink pad & stamping blocks
I started by making my background. There isnt much rhyme or reason to it really. A few sprays here, a bit of crayon through a stancil there. A bit of water here and there..
Its why I love making journal pages. I really just have fun with the colours.

I added the clear paste through a stencil to get the measuring tapes done and left that to dry. Once dry I stamped my Zen lady and added my hearts.

My hearts are from the Whispering Hearts stamp set. I simply stamped them onto scrap pieces of card, coloured with distress ink and cut them out.

I finished the project with a diecut greeting from my stash and a bit of guilding wax here and there.
And that is all from me for today.

Thank you for popping by and for any comments left behind.

Don't forget to come visit me on FaceBook, Twitter, Instagram, Pinterest, Youtube or my FB page.
 Happy Crafting


Wednesday, 4 December 2019

Stitched Friends in the snow - Colourific Inspiration.

Hello Everyone
and welcome to my blog.

Today I want to share a quick little card I made with stamps from Colourific.
Annelies have a great selection of stamps in the STORE, but the "Stitched Friends" are one of my favourite sets.. I have also used the "Christmas Minis" set for my card today.


For this little card I started by making a background of snow. Its made by simply tearing a piece of copy paper into something that resembles mountains. Then simply swipe your blending tool, starting on the paper and out onto your card, so you build up colour. Move the paper around and repeat till you get the desired effect.

I used the "Spotty Background" stamp to create the snowfall on the background. I simply stamped with versamark ink and set with white embossing powder.

My little stitched snowman is stamped and coloured with watercolour pencils on to water colour card stock, as is my little robin.
The candy cane I stamped with red distress ink and just dragged a bit of the stamped colour around.

I added them all to my snow background with foam tape, mounted the background at an angle on to my mat and then stuck to my card.
And that is all from me for today.
Thank you for popping by and for any comments left behind.
Don't forget to come visit me on FaceBook, Twitter, Instagram, Pinterest, Youtube or my FB page.
 Happy Crafting


Wednesday, 13 November 2019

Mini Kaleidoscope cards - Colourific Inspiration

Hello everyone

I haven't been blogging my creations for a while as life became a bit hectic, but as its starting to settle down again, I jumped at the chance to get back again..

For this weeks creation I had a play with the Kaleidoscope stamp from Colourific.
I love this stamp. Its so pretty and great for both backgrounds and as a centrepiece.


 I decided to make a trio of this design. The cards are all the same, simply just changed around the colours.
The card base is cut at 100x100mm - the middle piece at 95x95mm and the top is 90x90mm.
I coloured each layer in one of each of my chosen colours.
For the top, I used my misty stamping tool to help me get the stamping in the same spot on all 3 cards, but you can use a stamping block as well/
I finished each card by using foam pads between each layer, adding a wooden greeting and a few gems.

Its a very simple card design that could either be strung together to a folding card or they can be used individually

And that is all from me for today.
Thank you for popping by and for any comments left behind.

Don't forget to come visit me on FaceBook, Twitter, Instagram, Pinterest, Youtube or my FB page.
 Happy Crafting


I

Wednesday, 2 October 2019

A snowy scene - Colourific Inspiration

Hello Everyone
and welcome to my blog.

For this weeks Colourific Inspiration I have gone all snowy.
In honest, I'm an autumn baby so October and November are my favourite months.. but you cant beat a bit of snow lol

For this weeks project I used a selection of colourific stamps, you can find them all in the STORE.

Ive used:
Sentiment (from the Christmas minis set)
Snowman (from the stitched Friends set)
Snow background (the Spotty background stamp)
Robbin (from the Christmas Minis set)
Candy cane (from the Santa's Sleigh set)


 For this card I made a snowy background by first stamping my spotty background stamp, using versamark ink, and heat setting with clear embossing powder.

I then made a hill stencil from a piece of copy paper and used distress ink to create the hills.
I stamped, coloured and fuzzy cut my snowman, candy cane and robin and added them all on foam pads.
I stamped and die cut my sentiment and die cut a few Christmas trees to finish the card.

And that is all from me for today.

Thank you for popping by and for any comments left behind.
Don't forget to come visit me on FaceBook, Twitter, Instagram, Pinterest, Youtube or my FB page.
 Happy Crafting


Wednesday, 18 September 2019

Mixed media card - Colourific Inspiration

Hello Bloggers
and welcome to my blog.
Its once again Wednesday and my turn to share some  inspiration using the amazing stamps from Colourific.  Ive used a selection of stamps for the mixed media card Ive made for today. You can find them all in the STORE.


I started by adding distress ink to my background. I used water colour card stock to make sure it could take enough water to make the colours blend.

I used Archival black ink to stamp strait onto my background. I used the A6 Borders and Stems and the A6 Grunge background.

I stamped the butterfly and the sentiment from the A5 Butterflies take flight set on to scrap watercolour card stock and also used distress ink to colour, but this time i used a homemade silver mist spray as my water. This has given the sentiment and the butterfly a bit of sparkle.

I cut out the butterfly and added to my card base using foam tape.
The sentiment I cut into single words and added scattered around the card.

This is such an easy way to make a mixed media look to a card and can be done using any stamps you have in your stash.

And that is all from me for today.
Thank you for popping by and for any comments left behind.
Don't forget to come visit me on FaceBook, Twitter, Instagram, Pinterest, Youtube or my FB page.
 Happy Crafting


Wednesday, 11 September 2019

Tiny Hearts - Colourific Inspiration

Hello Bloggers
and welcome to my blog.
Its my turn to share a bit of inspiration using the amazing stamps from Colourific. 
 You can find the stamp I've used and all the other fantastic stamps in the
STORE.

I have 3 cards to share today but they are all variations of the same ideas and I use just the 1 background stamp.
This is a technique you can do with any background stamp and with a bit of fiddling around with your inks, use any stamp you have.


These cards all started out as simple stamping on my card stock with my Tiny Hearts Background stamp. The gradient in the colours are made by overlapping the inks. I used Distress ink for all 3 cards and if you start with the lighter colour on your stamp they wont really contaminate each other.

After stamping I cut 2 of the backgrounds into strips and added them to my card with foam tape to give them a lift. Use regular tape if you don't want the extra bulk.

I finished with a couple of die cut sentiments and a few black gems..

And that is all from me for today.
Thank you for popping by and for any comments left behind.
Don't forget to come visit me on FaceBook, Twitter, Instagram, Pinterest, Youtube or my FB page.
 Happy Crafting


Wednesday, 21 August 2019

A bottle of love.. Colourific Inspiration.

Hello Bloggers
and welcome to my blog

Todays post is another tag. Im really enjoy crafting on tags and they can be used for so many things.
As per usual, I have used a selection of stamps from Colourific and you can find them all in the STORE.

The specific one I used for this tag is:
A6 - Grunge Background
A6 - Borders & Stems

A5 - Champagne & Cocktails


I used a tag cut from canvas paper, I really like working on this surface due to the way it takes the ink but also for the texture. I started by stamping my bottle with Archival (waterprrof) ink.

I then used Distress Stains and water to create my background. If you have ever used Distress products you will know that once you add water, the ink has a mind of its own lol, so there is no way to ever recreate a background fully.

Once I liked my background I stamped the details with Distress Oxide Inks.
I kept my stamp on the backing card as I stamped. Added a bit of ink and simply rolled the stamp over the corner of my tag. I find that not using a stamp block give a softer egde to the stamping.

I then took a bit of distress ink and coloured my bottle. It was already green from the background ink but I wanted it to pop a little bit.

To finish, I stamped the little details of the bottle on to scrap card and coloured with gold Distress Stain and oce dry, fuzzy cut and glued on top of the bottle. I added a few gems and Voila.. all done.

Oh before I go.. I just wanna mention our FaceBook group. Colourific now has a group for anyone who is interested in the products. There is a competition over there and the Desgin Team shares their projects every day. And we would love to see your Colourific creations too. Come and join us.


And that is it from me for today.
Thank you for popping by and for any comments left behind.
Don't forget to come visit me on FaceBook, Twitter, Instagram, Pinterest, Youtube or my FB page.
 Happy Crafting


Thursday, 8 November 2018

The little christmas tree.. Colourific Inspiration.

Hello Beautiful People
and welcome to my blog.

Its once again my turn to share a bit of inspiration for
Colourific.

My mojo has been on a holiday for the last few months.. Ya I know, it happens to us all but its so disheartening lol.. Lucky for me I normally craft in bulk so always have a card or 2 lying to share if need be but yesterday I decided to have another attempt at creating..
My little girl was home with a cold so we stuck on a Christmas movie (yes I know its only November, but Christmas should be all year in my book hehehe) and crafted away together..

And lo and behold, I came up with a couple of cards that I'm happy with.


This little card is a bit on the darker side I think but it has a bit of sparkle too it that brightens it a bit.
My card blank and my background is both craft card. I used the "Stitched Friends" stamp set for my topper and the "Christmas Text" stamp for my background.

I started by heat embossing the background with clear embossing powder. I repeated this till I had the whole background done. I then added distress ink around the edges. This really makes the embossing stand out. I then stamped and coloured my little tree. I stamped on to watercolour card stock and heat set it with black embossing powder. I coloured with watercolour pencils.

I matted and layered my background on to gold mirri card and finished with a black heat embossed sentiment also on gold mirri card. The greeting is also from the stitched friends set.

And that is all for today. Hope you like my wee card.
Thank you for popping by and for any comments left behind.
Don't forget to come visit me on FaceBook, Twitter, Instagram, Pinterest, Youtube or my FB page.
 Happy Crafting


Thursday, 25 October 2018

Lipstick Background - repeat stamping - Colourific Inspiration

Hello Beautiful People
and welcome to my blog.

Its once again my turn to share a bit of inspiration for
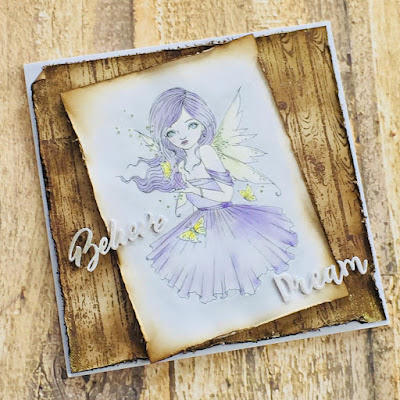
Colourific.For todays project I have used the
A5 Girls Night Out stamp set.
Its a class set that features some sexy stilettoes and some hot lips, but it also have 2 little lipstick stamps. I love these and when I saw this set, I knew strait away what gonna make..
Another background lol

 
Its a very simple card but its one of my favorite layouts. It lets the stamp speak for itself yet it delivers the message intended, in this case a "Hello".

I have worked on watercolour card stock, repeat stamped the 2 lipstick stamps with archival ink as its waterproof, and then just used distress ink to colour with.
I use my Distress ink pad, just pressed my pad onto my glass mat and then used a water brush to pick up the colour with.

My sentiment is a die I tripple cut and layered, I stamped the strip where it says beautiful (stamp from a freebie set) and overlaid the sentiment on a wee strip of vellum.
I matted my card onto black cardstock and finished with a few star gems.
And that is it for today.
Thank you for popping by and for any comments left behind.
Dont forget to come visit me on FaceBook, Twitter, Instagram, Pinterest, Youtube or my FB page.
 Happy Crafting

Friday, 12 October 2018

Colour Crazy Challenge -Guest Designer - Breast Cancer awareness image

Hello Beautiful People
And welcome to my blog.

Todays post is once again for my Guest Design Team

Colour Crazy


Its a weekly challenge with an "Anything Goes" theme, as long as you colour your images. But pop over to the blog for all the rules and regulations.

I have joined the Design Team this for this weeks challenge and used a digital image from
Ching-Chou Kuik and have used the image called "Believe in Faith/Breast Cancer awareness Ribbon Girl". A stunning piece of art work.


My background is a stamp from my stash I stamped repeatedly with distress ink and smothered in more distress ink. I scruffed the edges with a pair of sissors and added more distress ink.

My image is printed on to watercolour cardstock, left to dry overnight and coloured with watercolour pencils. My sentiments are diecut and layered and covered with a glitter pen for a bit of shimmer.

And that is it. For all the details of the challenge pop over to the blog.
  Thank you for popping by and for any comments left behind.
Dont forget to come visit me on FaceBook, Twitter, Instagram, Pinterest, Youtube or my FB page.
 Happy Crafting


Thursday, 11 October 2018

Rainbow Princess cards - Colourific Inspiration

Hello Beautiful People
and welcome to my blog.

Todays post is for
Colourific as its once again my turn to share some inspiration..

For todays cards I have gone all rainbows but with a girly feel to them.
I have used the
A5 Princess Carriage set for both cards

Both cards are pretty much made the same way. Distress ink rainbow effect, sprayed with a homemade perfect pearl mist. . My sentiments has been stamped strait on to my backgrounds as is the start on the carriage card and the horse itself.
On the carriage card, I stamped onto black cardstock and heatset with gold embossing powder and the fuzzy cut the carriage. Its onthe background with foam pads.
Finished both cards with a few clear nuvo drops and that is about it.

with wee gaps but I just used a fine liner to fil in any gaps.
And that is it for today. Thank you for popping by and for any comments left behind.
Dont forget to come visit me on FaceBook, Twitter, Instagram, Pinterest, Youtube or my FB page.
 Happy Crafting


Thursday, 27 September 2018

Colourific Inspiration - Alphabet stamps

Hello Beautiful People
and welcome to my blog.

Its once again thursday and my turn to share a bit of inspiration for
Colourific.

For today I have made 2 cards. It was really just 1 idea that became 2 as I was playing lol..
Let me share the pics and I will explain.

First though.. The stamps I used you can find in the STORE.
I used the:
A4 Alphabet and Numbers
and the
A5 Princess and Carriage
 For this one I started by stamping my letters with Archival ink. I then used distress ink and lots of water to add colour into the letters. I held the card upright while doing this so the colour just ran down the card. As the colours flowed, the exess landed on my glass mat and I used that extra colour to add to the top of my card stock.. Hope that makes sense..
Once the card was dry I stamped the wee tiara, the star and the princess also with Archival.
The wee strip of black and white at the top of the card, is actually made using another Colourific stamp, I used the rainbow stamp from the A5 unicorns and chasing rainbow set.
I just stamped the end of the rainbow repeatedly and coloured in with a black sharpie before cutting to size.
I finished with glossy accent on the letters and a few clear nuvo drops.

Well and then this one... This one came about because I still had more water/ink on my glass mat. So I decided to mop it up on a piece of water colour card. I loved the impression so much and the colours oviously matched card 1, I decided to make another card in the same style.
When I made card no 1 I was toying with the idea of cutting/colouring/raising the letters but as background 2 came about I decided to do that on this card..

The letter are a bit stronger in colour the the rest of the card. Simply as I had already cleaned up the mat so I had to use a bit of fresh ink. But I like that the letters really pop.
I finished this little card using a flower stamp from the A6 modern flowers set.

And that is it from me for today. Make sure you pop over in the Store to see the whole stamp collection and come and join us in our FACEBOOK group.
Thank you for popping by and for any comments left behind.
Dont forget to come visit me on FaceBook, Twitter, Instagram, Pinterest, Youtube or my FB page.
 Happy Crafting

Friday, 21 September 2018

Shaker card with half cut out - Daring cardmakers Challenge.

Hello Beautiful People
and welcome to my blog.

Its time for my third guest post for the
Daring Cardmakers Challenge Blog.

Its a weekly challenge and I have joined the DT for the month of september.
Make sure to pop over to the blog for all the deatils.

The challenge this week is "Beads".


This one is a simple "mop-up" background but I used a shimmer spray instead of plain water. I then stamped my butterfly (from Colourific) and my sentiment using archival ink. I then used a knife and cut around the wings of the butterfly making sure I didnt cut the body. On the back of the butterfly I glued a piece of accetate and build foamtape around the opening and on the rest of the card and filled it with beads and sequins. I then added my card blank on top and finished with a few beads on the butterfly's body and a bit of glossy accent.

And that is it for today. For all the details of the challenge pop over to the blog.
  Thank you for popping by and for any comments left behind.
Dont forget to come visit me on FaceBook, Twitter, Instagram, Pinterest, Youtube or my FB page.
 Happy Crafting