Showing posts with label Scrapbooking. Show all posts

Monday, 2 October 2017

Graciellie New release teaming with Unity Stamps and Westcott..

Hey Bloggers..

I have a rather long post for you today.. First of all.. its NEW RELEASE time over on Graciellie Design.. BUT this month Gracie has teamed up with Unity Stamps to make a rubber version of the stamps.. This means that you have the choice of digital stamps as normal OR rubber stamps..

Things runs as normal though, our usual new release BLOGHOP is still happening.. only difference is the prize.. For this bloghop, Unity stamps is sponcering with 3 prizes of stamps.. But do pop over on the Graciellie blog for all the details and to start the hop..

Before I share my project, I want to mention another company.. This month, some of us Graciellie girls, have been so lucky to team up with Westcott. Westcott does some amazing product and have been so kind to share with us girls to try out. 

 I decided to make a scrappage for this hop.. I used the stamp set called "May Blessings Follow You". A beautiful and delicate set with beautiful greeting to match.

 
 Here all the goodies I recieved and used, from Westcott.

After printing and colouring I used the fine nip sissors and the craft knife to cut out my flowers.
I have crafted for many years and can honestly tell you that this craft knife is amazing. The blade is strong yet thin enough to make it curve a bit when cutting out. 


This paper trimmer has a Lock feature. A great feature to ensure you a perfect cut each time.

 These sissors are amazing also.. They are the heavy weight sissors and lie so well in the hand.


I used the Glue Pen to add all my elements and to give them a bit of a lift off the page.


This is the stamp set I used.

Right BLOGHOP... IF you have just popped on to my blog for a nosy, Thank you, BUT if you want to follow the hop, pop back to the Graciellie Blog to start.. and if you are already following the hop, its time to pop over to Milagros blog..
Dont forget to add a comment to ALL the blogs to be in with a chance to win.

But that is all from me today. Thank you for popping by and for any comments left behind.
Dont forget to come visit me on FaceBook, Twitter, Instagram, Pinterest, Youtube or my FB page.
 Happy Crafting

Thursday, 1 June 2017

Graciellie Design New Release Bloghop..

Hey Bloggers..

Ohh I have exciting news to share this month.
I have been chosen to be part of the guest DT for June for 

Im taking part in the New Release Blog hop that the team does and with a prize of $10 for the Etsy shop, its well worth it. Hope you will join in.

Here is the order in which you need to jump round. And dont forget to leave a comment on each blog to be in with a chance to win. Good luck.
Graciellie Design
Arjita
 
Agnieszka
Ginny
Shylaa Shree
Gayatri
Barbara
MarĂ­a Pilar


Guest Designers:
YOU ARE HERE: Marleen  
Shilpa

 I have used the brand you digital stamp set called "Wonderful Things"
Find it in the Etsy Shop

Here is what I have made for this time:
  For this project I copied my strawberry image into Word. I scaled the image and copy & pasted the image to fill up an A4 sheet. I then printed the sheet and left it to dry overnight.
Digital images can always smudge a bit when you colour, but I personally find that leaving the images to dry overnight gives the ink enough time to set and I dont have that problem.
I used promarkers to colour and smudged a bit of distress ink around the images and edges.

I left this project very simple. I wanted the images to stand out. So all I did after my background was finished was to cut it to fit my card and added a mat and my sentiment.
My sentiment is also from the "Wonderful things" digi stamp set. I once again copied it in to word, re-sized and printed. I didnt leave this image for long cause I didnt colour it. I simply just fuzzy cut it and added a bit of distress ink.

What caught my eye when I first saw Graciellie Designs, was the Sentiments. Each digital set comes with several sentiments, and I love that. As I had the printer switched on, I printed this sentiment to have a play with. I love scrapbooking so I decided to make a fun background, a picture of my babies and some homemade glue drop to make this quick page.

And that is all from me today. Thanks for popping by and for any comments left behind.
Dont forget to come visit me on FaceBook, Twitter, Instagram, Pinterest, Youtube or my FB page.
 Happy Crafting

Wednesday, 1 March 2017

Scrappage for BeeCrafty..

Hello Bloggers..

Today I have a scrappage to show you. Its for my weekly spot for 

I actually started this page when the girls first brought out these stamps on Hochanda. But Im sure though, that Im not the only crafter that gets stuck on a project from time to time lol.
Needles to say, the page was started but never finished. I just didnt know how to finish it.. Until the day I took out my pile of unfinished projects and this one jumped out at me.. In no time I knew what I wanted and it was done..
Its funny how these projects seem to have a life of their own at times lol..

 
 Picture is of my "baby" Abbie. She was about 3 on this photo.

 I started by stamping my Marple leafs in both sizes on to a piece of A4 cardstock. I then took the matching Inkable and lay round my stamp and coloured the leafs with my distress ink and blanding tool. I guess I could have coloured them with my markers or pencils as well.
I added some strips of washi tape so it would be peaking out from my photo. I struck the photo down with double sided foam tape to give the LO (LayOut) more dimension. I then lay out all the flowers, making sure i was happy with the arrangement before glueing them down. I finished off this LO with some foam letters.

I love how something like these stamps can be a centre piece, and yes these stamps canwell hold their own, but also that they can be used as a background like this. These stamps was handdrawn by Sam and I LOVE that about them. 

Anyway, that's all from me for today.
 Thanks for popping by and for any comments left behind.
Dont forget to come visit me on FaceBook, Twitter, Instagram, Pinterest, Youtube or my FB page.
 Happy Crafting

Wednesday, 11 January 2017

BeeCrafty weekly post :-)

Hello dear bloggers
 
Back again with my weekly slot for 
 Today I was to share my projects for the BeeCrafty show on Hochanda from the 9th Jan.
 I didnt get that many project done for this show as due the the postal delays that always happens over the festive season, I had to get samples back to Bev and Sam just a few days later in order to make sure they would make it in time.

I used the following stamps to make these samples
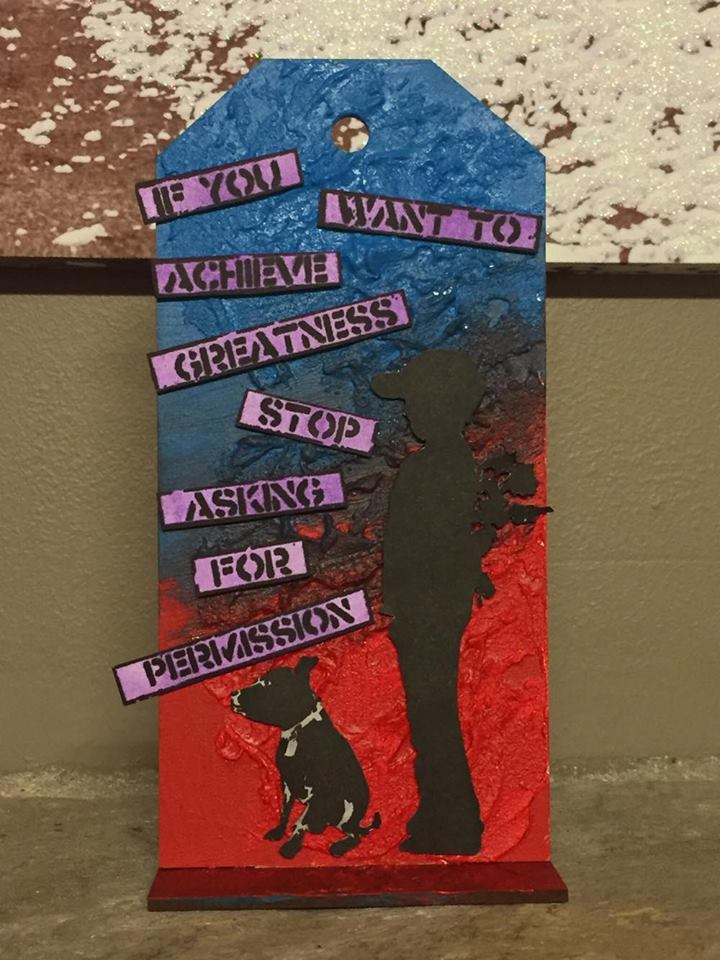
Inspired by Banksy "Boy with Dog XL" stamp
This one is made form one of the MDF tags. Its painted with yellow acrylic pain and stamped with black archival ink. I then took my BeeCrafty blending mat and used the little stencils on there to add the honey combe and the little bee's.
 This one is made using the paper pack Bev had on Hochanda a couple of months ago. I used a sheet and added Distress ink and glitter texturepaste through the stencil. The dots I added are made using my gluegun and coloured glue sticks.

 Another MDF tag and more acrylic paints. I created a bit more texture on this one with a bit of the  glitter texture paste I used throgh the stencil to create my word..
Now the boy on this one.. He isnt actually stamped. Bev has started to add an accetate sheet over the stamps with the image on so its easier to see the stamp. Now I love being frugal, and the way I store my stamps, I dont need the sheet, so I pulled it off the stamps and cut out the boy. I simply just glued him strait on to the tag. I really could just have stamped him and fuzzy cut him but I liked the idea of using the sheet and not just throw it away.
 And then a canvas.. Oh I LOVED making this one. Not something Ive done much off before but oh so much fun.. Bev sent us the canvas for a previous month but as I live in Ireland and post takes extra time compared to the others living in the UK, I didnt get a chance to play with it. And I was a bit scared to make a mess of it if im to be honest.. Anyway, I saw the others making some amazing canvases and seeing how amazing they did, I just went for it lol..
This is all acrylic paint.. All the texture is made by simply adding tons of paint on. Once the background was dry I used red acrylic paint through the stencil and on the littler spacers.. Those bits up on the corner is the wooden pieces that always comes with a canvas.. I think its to tighten it.. Again not wanting to waste them, I painted them and added them to my project.
The boy and girls on this one are stamped and fuzzy cut before being glued to the canvas.

 And then one of Bev's amazing MDF art boards.. God I LOVE these.. Those of you who pop by and see my BeeCrafty posts will know Im a paper artist.. I dont normally venture into canvases and MDF, but not one for turning a challenge down, I have now fully fallen in love with these..
My method on this one is pretty much the same as the other pieces. Texture paste, Acylic paint, stamping and fuzzy cutting.. The words on this one is one of my favorite sentiments from BeeCrafty, and its something I often remind myself..

 Another Art board.. More acrylic paints, more texture paste through a stencil and a bit of texture stamps stamps with distress ink..
I actually did the paste first and once dry i painted over it. While paint was still wet, I took a baby wipe and "cleaned" the words. It resulted in the words still being green, but woth the silver shining through.

See, I got brave lol.. Having made the yellow canvas above, I got a bit more confident and pulled out these mini canvases. I bought them in the £shop ages ago, but as I said above, Im a paper artist, so never found a reason to use them... Till now...
I actually taped them together to do my stamping on them to ensure that the stamping would line up. I used the "graffitti area" stamp for this. It was sadly the only project I managed to make with this stamp, but the others made some amazing samples with this, so make sure to come back and check the blog to see their projects.
The dog here is once again cut from the accetate sheets that came on the stamps, and just glued right on top.


Last but not least, a card. The only card I made for this show lol.. Once again being frugal, I decided to make a wee shaker card.. with a difference.. I made this from the wee bags the stamps comes in. Once I had taken the stamp out of the bag, I measured a piece of card to fit inside. I then created the art work using the stamps and distress ink.
I then slotted the card stock into the bag, added my heart confetti and sealed it up.
In order to make it a card, I cut a second piece of card to fit the bag and stuck it onto the back of the bag. This hid the seal line of the bag and also the mess on the back of the artwork..

And that is all the samples from this months show.
 Thanks for popping by and for any comments left behind.
Dont forget to come visit me on FaceBook, Twitter, Instagram, Pinterest, Youtube or my FB page.
 Happy Crafting

Wednesday, 19 October 2016

Hochanda samples for BeeCrafty..

Hello bloggers..

Well today I will really just re-cap the samples I had on the BeeCrafty show on Hochanda this past monday. It was 3 amazing shows.
Not only did our Bev recreate 1 of my projects, no she did 3.. Such a buzz.. Thank you Bev x

For this show we all used the feather collection stamps, the art boards and the BRAND NEW paper packs. I got the background ones and had not seen the xxx till the show.. got they are both yummy.
My favorite one is the background one and im guessing the girls sent that one to me, as they know I LOVE scrapbooking and these background are just perfect for that as well as cards, mixed media, canvases ect ect.. So yep.. I jumped right in and made a LO (LayOut).

I got the 8x8 pack. Such a great size even for scrapbooking. I have some ideas using these papers for a second LO but it will be built on a 12x12 plain background ;-)
On this LO I added more interest on the background but stamping different elements from the stamps. The loops you see around the edges, is from the "hope & faith" loop stamp. I just only added ink to a little bit of the stamp. I also used just the words from the same stamp above the pic, just inking the word. The clock and cogs are cut from a second paper and layers on and my feather, inkwell, nips and the wings are stamped on to a piece of the paper pack, heat embossed, cut out and layered on the the LO. I finished by stamping my greeting in black strait under the pic.
This one is made with the paper pack as well. Simply just 1 sheet cut to size fitting the card with a blck mat. I stamped the ledger stamp with peeled paint distress ink as well as distressing the egdes with the same ink. I then stamped my feathers with black Archival ink.
I took my "Time flies" stamp and cut it apart to get "time flies" bit on its own. Dont worry, you can assemble your stamp on the stamp block again and no one will ever know the stamp was cut ;-)
I aslo stamped my greetings in Archival.
 ah I love the colour on this one. This one came about as I wanted some more dimention on my cards. But there are strict rules on what goodies we are allowed to use on the samples for the TV show. You see, if we start using goodies that Hochanda dont sell, Hochanda could get in trouble. And also our job is to promote BeeCrafty. So rules are that we may use the goodies from BeeCrafty that Bev has had on recent shows. After getting the ok from the girls, I pulled out my BeeCrafty Inkables. FOr this one I used the small star "inny" to emboss into my card. I smothered the who card in "Picked Raspberry" distress ink before I outlined the stars with a white pen.
My wings, I stamped onto white cardstock and heat embossed with white glitter embosing powder, cut them out and finished them with a wee gem.
 \I really love this one. But yellow is my favorite colour so no surprise lol. I used the circle inkables to make my backgrouns and the rest is just stamping.
The nips are strait onto my card itself and the feather is raised on a black mat using foampads.
 Another yellow creation.Bev recreated this one. A bit more vintage looking this one I think.
Watercolour card stock. Water wash distress ink background. My wings are white embossing powder and I used the heart "inny" inkable to gently make the heart on the background.
I just gently swiped the colour out from the middle of the heart "inny"out to the egdes.
I finished with water splashes and black splashes using my splatter brush.
  A shaker card.. Something I've only just started making...
Background is distress ink puddles where I just dragged my card through and left to dry. I then stamped on my feather and slowly cut it out. I stuck accetate on the back of the feather hole.
I then added my black mat to my card blank so it was ready. I turned my feather piece over and added double sided foam tape all around the feather and the edges. Make sure there is NO gaps around the feather or your sequins will fall out. I put my sequins down on the black card and added the feather piece over. I finished with my greeting and hand drawn stitches.
 Bev recreated this one as well. Its a simple distress ink background where I just stamped the large wings with versamark and heat embossed with clear embossing powder.
I stamped the wing again and my greeting on a panel of vellum and heat embossed with gold embossing powder. Voila.. Very quick and easy.
 And last but not least... My art board.. I am still new to these and It came as a surprise to me that it has been my most successful project from this show. It has gotten so many compliments since posted and Bev recreated this as well.
I simply stuck some paper on is from the Background pack, added a few extra bits I cut from a second sheets. Smothered it in matching distress ink (These papers matche the distress ink palet SO well. think this one is victorian velvet but not 100% sure)  and stamped the nips and the ledger in the same colour. I stamped the feather and ink well and heat embossed with gold, cut them out and layered ontop. I finished with a bit of gold embossing powder around the edges and stamping my greeting in black Archival.

And that is it from me for today. I hope you like my creations.
Many thanks for popping by and for any comments left behind.
And dont forget to come visit me on FaceBook, Twitter, Instagram, Pinterest, Youtube or my FB page.
 Happy Crafting


Wednesday, 13 July 2016

Bee crafty - More leaves..

Hello bloggers 
and welcome to my slice of the www..

Today I want to share my weekly post for 

Last week I totally forgot that I was to share the last 2 samples that I made for the June BeeCrafty show on Hochanda. I already shared all the cards and tags I made but I also made 2 scrappages.
I dont thing they made it on air (I missed bits of the shows and havent had time to catch them up yet). There are so many sample for Bev and the presenters to show that its close to impossible to share them all. So that is where the blogs come in handy. We can "take our time", show what we have made and have a platform to answer any questions on how we make things..

Anyway, I've used the new BEAUtanical stamps and Inkables, and they are all availiable in the BeeCrafty STORE, HERE.

 This page is a pic of my youngest, Abbie. The page is made using the stamps and distress inks.

This one is a pic of my 2 elder babies, Emma & Michael. For this one I used the sentiment stamp to make my background and I used the Inkables to make the leaves. The bigger words are from stash.

And that is all from me for today.
Many thanks for popping by and for any comments left behind.
  If you want to see more of my work, come visit me on FaceBook, Twitter, Instagram, Pinterest or my FB page. Its where I share the most.
 Happy Crafting

Friday, 17 June 2016

Dragons Lair Design - A Taste of Summer - June Guest spot

Hey Blogger Friends..

Time for my last post this month for
Dragons Lair Design.

For this post I have once again used the Digital kit called "A taste of Summer".
Just pop over to the digital STORE and you'll find the kit right there on the front page ;-)

Please forgive the white blob. My children has requested not to have their pictures posted on social media anymore.

This LO (LayOut) is made by simply printing the papers and elements from the kit.
 
I print in "Word" by simply copy and pasting the bits I want.
When doing this however all the papers in the kit print in 7x7 and as I scrap in either A4 or 12x12 I used the direct "print" option on my pc. I simply just right click on the paper I wanted printed and pressed print. The PC then pop up with a selection of sizes I can print in and I just chose the A4 option. Now I must admit that this does however mean that the PC automaticly crops the image to fit so you loose some of the design, but as it was a "plainish" design I felt it didnt matter for this project.

After printing I simply layered up my papers. The brown circles in the background are die cuts and coloured with distress ink. The corners are also diecut from the papers as is the border under the picture.
The letters, the washi tape and the different gems are from my stash.

I had a few bits left over from the kit after finishing my scrappages so I made a wee card too.
Apaprt from my sentiment (which is an actual stamp) everything is printed from the kit, cut out and layered up.

  And that is all from me for today.
Many thanks for popping by and for any comments left behind.
And dont forget to come visit me on FaceBook, Twitter, Instagram, Pinterest or my FB page.
 Happy Crafting

Saturday, 11 June 2016

Dragons Lair Design - Vintage Letters

Hey bloggers

A quick post today to share an LO (LayOut) Ive made for
Dragons Lair Design.

Its made with the "Vintage Letters" kit. A beautiful kit and you can find it in the digital STORE with all the other digital kits and stamps. Pop over to the store now as there happen to be a 30% reduction on this kit for a few days ;-)


I am a "Paper ONLY" kind a scrapper but I have to say I DO love the digital kits. I LOVE that I can simply print the bits and bobs from the kit that I want and not having to worry about storing the rest.
A bit of space on my PC is all it takes. 

This LO is of my maternal grandmother. Sadly she passed away nearly 10 years ago but we all still miss her. I havent got many photoes of her (must go raid my mums collection hehe) but this one is one of my favorites. We were deep in conversation at my "goodbye" party. (I moved to London from Copenhagen with my now Husband) We had such great craic I didnt even notice hubby was walking around snapping pictures of us all. A cherised moment I have never been able/ready to scrap.
Until now :-)

Anyway.. As always I print in "Word" by simply copy and pasting.
I added gold embossing powder through a stensil on my backing sheet and all the letters are from my own stash. The rest is all from the kit and there is loads more in the kit that I havent used... Yet!!

  But that is all from me for today.
Many thanks for popping by and for any comments left behind.
And dont forget to come visit me on FaceBook, Twitter, Instagram, Pinterest or my FB page.
 Happy Crafting

Thursday, 9 June 2016

Dragons Lair Design - A Taste of Summer - June guest spot

Hello Blogger Friends..

Im delighted to once again having been asked to do a guest spot for
Dragons Lair Design.
Im a HUGE fan of Janette's Digital Design and have been working for her for years but for personal reasons had to scale back from being a full time DT and DT leader.
Im back in the swing again and delighted to have been invited back to the team this month to share my first of 3 post. 

For this post I have used the Digital kit called "A taste of Summer".
Just pop over to the digital STORE and you'll find the kit right there on the front page ;-)

Please forgive the white blob. My children has requested not to have their pictures posted on social media anymore.
This LO (LayOut) is made by simply printing the papers and elements from the kit.
I print in "Word" by simply copy and pasting the bits I want.
When doing this however all the papers in the kit print in 7x7 and as I scrap in either A4 or 12x12 I used the direct "print" option on my pc. I simply just right click on the paper I wanted printed and pressed print. The PC then pop up with a selection of sizes I can print in and I just chose the A4 option. Now I must admit that this does however mean that the PC automaticly crops the image to fit so you loose some of the design, but as it was a "plainish" design I felt it didnt matter for this project.

Anyway, Once I printed the sheets I wanted I made the little rosettes using my Tim Holtz die. The big one in the middle (background) is actually part of the kit and is printed out.

The rest was simply laying and glueing. 
All the letters are from my stash as are the gems.

  And that is all from me for today.
Many thanks for popping by and for any comments left behind.
And dont forget to come visit me on FaceBook, Twitter, Instagram, Pinterest or my FB page.
 Happy Crafting

Sunday, 20 March 2016

More forgotten stash... This time its decoupage..

Happy Sunday everyone..

Well I thought I'd share last nights makes with you. 
Some of you may have seen my previous posts about using my forgotten stash.. but to those that havent, heres the deal:

Most of us crafters buy a load of crafty goodies, all with the best of intentions.. Be it stamps, papers, dies, decoupage, embelishments ect ect.. We all do it. We buy, maybe play once and then it goes to the side as either our favorite stuff comes out or something else new.. 
This leaves us all with a load of crafting goodies that goes forgotten and unloved..
I am beyond guilty of this hence why I set out on a mission to rummage through my shelves and boxes and make some projects with all this forgotten stash..

If you want to follow my blog series of Forgotten Stash and see my earlier posts, just go to the labels on the right side bar and press "forgotten stash".
You can also follow me by email to get any updates I make here on my blog. Just find the "follow me by email" box out on the right.

And with that said let me show you what I made last night.
I rummages through my papers and found some 12x12's I'm guessing my sister kindly gave me. There were "just" 6 sheets so guessing she shared a paper pack with me at some point.. (and I totally dont remember even seeing papers so there you go.. talk about forgotten eh!!)
Anyway, I decided to make something with them and managed a 12x12 scrappage & 2 cards (which I'll share during the week)

 
I wont bother going into details on how I made this LO (LayOut) as its all very simply layering things on top of each other till I was happy.
But I will tell you that the picture is of my "baby" Abbie. (she will be 6 in the summer) She is such a funny little thing, full of laughs and energy.


The funny thing is.. As I started to work on this page, I also started using even more forgotten stash.
*The gold letters.. they were a present from a friend but never used..
*The die I used to cut the brown circles.. Had it for years and not used it in a LONG time..
*The little clay bow on the "H"..  made it more then a year ago but never found a place to use it (or all the other clay embelishments I made that day)
*And last, the 2 hessian bows in the corners.. bought a long time ago, used half the pack and forgot about the rest.

I'm hoping with this series og blog posts to inspire my readers to join me on my mission to use up some of all the forgotten stash I know we all have.
We live in a world where "NEW" is the way to go, and the craft world is no different. I love nothing better then to get the "latest hit" but I have found myself getting bored with it all and thats how my challenge came around.

So please join me.. Use your unloved stash  & show me how.
Just add your link to your blog in a comment and I'll come over and nosy and leave some love.
Thanks for popping by and for any comments left behind,
 and dont forget to come visit me on FaceBook, Twitter, Instagram, Pinterest or my FB page.