Wednesday, 15 January 2020

Colourific is going to Hochanda

Hello everyone
and welcome to my blog.

A very exciting post for me to share today.
COLOURIFIC IS GOING TO HOCHANDA
Im so excited to see Annelies and my teamie Alice demoing, and sharing with you all, the amazing stamps from Colourific.
They will be on Hochanda on Sunday 26th of January at 12 noon. 
Dont miss it :-)
(The new stamps wont be in the Colourific store till after the show, but do pop over and check out all the other amazing stams)

But let me share with you one of the samples Ive made for the show.
The stamps are amazing.


This one is a journal page and I used a couple of the new stamps sets for it. 
I used:

  • A5 Zen Ladies B
  • A6 Whispering Hearts

    I also used 
  • Jornal page
  • Distress inks
  • Distress Sprays
  • Distress Crayons
  • Tim holtz Stencils
  • Clear paste
  • Mister with water
  • Diecut Sentiment
  • Gilding wax
  • Archival black ink pad & stamping blocks
I started by making my background. There isnt much rhyme or reason to it really. A few sprays here, a bit of crayon through a stancil there. A bit of water here and there..
Its why I love making journal pages. I really just have fun with the colours.

I added the clear paste through a stencil to get the measuring tapes done and left that to dry. Once dry I stamped my Zen lady and added my hearts.

My hearts are from the Whispering Hearts stamp set. I simply stamped them onto scrap pieces of card, coloured with distress ink and cut them out.

I finished the project with a diecut greeting from my stash and a bit of guilding wax here and there.
And that is all from me for today.

Thank you for popping by and for any comments left behind.

Don't forget to come visit me on FaceBook, Twitter, Instagram, Pinterest, Youtube or my FB page.
 Happy Crafting


Wednesday, 11 December 2019

Sleigh ride - Colourific Inspiration

Hello Everyone
and welcome to my blog.

Once again wednesday and my turn to share some inspiration using the amazing stamps from Colourific.

For todays card I've used the "Santa's Sleigh" set.


 Once again a very simple card.
I started with a black piece of card stock which I ran through my big shot with an embossing folder.

I then stamped, also on black card stock, the sleigh with versamark ink and heat set it using gold embossing powder.
I die cut the greeting and the holly for the corner and heat set them as well with the same gold embossing powder.

I finished by creating a mat, using the same embossing powder, by just swiping my versamark pad around the edges and heatsetting the powder.

And that is all from me for today.
Thank you for popping by and for any comments left behind.
Don't forget to come visit me on FaceBook, Twitter, Instagram, Pinterest, Youtube or my FB page.
 Happy Crafting


Wednesday, 4 December 2019

Stitched Friends in the snow - Colourific Inspiration.

Hello Everyone
and welcome to my blog.

Today I want to share a quick little card I made with stamps from Colourific.
Annelies have a great selection of stamps in the STORE, but the "Stitched Friends" are one of my favourite sets.. I have also used the "Christmas Minis" set for my card today.


For this little card I started by making a background of snow. Its made by simply tearing a piece of copy paper into something that resembles mountains. Then simply swipe your blending tool, starting on the paper and out onto your card, so you build up colour. Move the paper around and repeat till you get the desired effect.

I used the "Spotty Background" stamp to create the snowfall on the background. I simply stamped with versamark ink and set with white embossing powder.

My little stitched snowman is stamped and coloured with watercolour pencils on to water colour card stock, as is my little robin.
The candy cane I stamped with red distress ink and just dragged a bit of the stamped colour around.

I added them all to my snow background with foam tape, mounted the background at an angle on to my mat and then stuck to my card.
And that is all from me for today.
Thank you for popping by and for any comments left behind.
Don't forget to come visit me on FaceBook, Twitter, Instagram, Pinterest, Youtube or my FB page.
 Happy Crafting


Wednesday, 13 November 2019

Mini Kaleidoscope cards - Colourific Inspiration

Hello everyone

I haven't been blogging my creations for a while as life became a bit hectic, but as its starting to settle down again, I jumped at the chance to get back again..

For this weeks creation I had a play with the Kaleidoscope stamp from Colourific.
I love this stamp. Its so pretty and great for both backgrounds and as a centrepiece.


 I decided to make a trio of this design. The cards are all the same, simply just changed around the colours.
The card base is cut at 100x100mm - the middle piece at 95x95mm and the top is 90x90mm.
I coloured each layer in one of each of my chosen colours.
For the top, I used my misty stamping tool to help me get the stamping in the same spot on all 3 cards, but you can use a stamping block as well/
I finished each card by using foam pads between each layer, adding a wooden greeting and a few gems.

Its a very simple card design that could either be strung together to a folding card or they can be used individually

And that is all from me for today.
Thank you for popping by and for any comments left behind.

Don't forget to come visit me on FaceBook, Twitter, Instagram, Pinterest, Youtube or my FB page.
 Happy Crafting


I

Wednesday, 2 October 2019

A snowy scene - Colourific Inspiration

Hello Everyone
and welcome to my blog.

For this weeks Colourific Inspiration I have gone all snowy.
In honest, I'm an autumn baby so October and November are my favourite months.. but you cant beat a bit of snow lol

For this weeks project I used a selection of colourific stamps, you can find them all in the STORE.

Ive used:
Sentiment (from the Christmas minis set)
Snowman (from the stitched Friends set)
Snow background (the Spotty background stamp)
Robbin (from the Christmas Minis set)
Candy cane (from the Santa's Sleigh set)


 For this card I made a snowy background by first stamping my spotty background stamp, using versamark ink, and heat setting with clear embossing powder.

I then made a hill stencil from a piece of copy paper and used distress ink to create the hills.
I stamped, coloured and fuzzy cut my snowman, candy cane and robin and added them all on foam pads.
I stamped and die cut my sentiment and die cut a few Christmas trees to finish the card.

And that is all from me for today.

Thank you for popping by and for any comments left behind.
Don't forget to come visit me on FaceBook, Twitter, Instagram, Pinterest, Youtube or my FB page.
 Happy Crafting


Wednesday, 25 September 2019

A take on No Line Colouring - Colourific Inspiration

Hello Bloggers
And welcome.

Today I want to share a take on "No Line" colouring.
As per usual I have used stamps from Colourific, and this time I used the
Hydrangeas
set.
Its a technique I love the look of but just never got the hang off. I'm not a whizz at colouring in anymore, simply because I stopped doing it as it was so time consuming. Instead I now use watercolours as I love the look and also as its so much faster than markers.


Anyway. I was playing the other day and decided I wanted my flowers to be colourful, so I stamped the flowers with Distress Oxide inks. It looked pretty but I wanted more colour so I went ahead and used the same colour inks as the stamped lines, to colour with. I simply pressed the ink pad on to my craft mat and used a water brush to colour in with.

The oxide ink leaves an oxidiced look to the colours.. hence the name I'm guessing lol, but it gives the colouring a bit more life. As I used the same colour the lines blure into the colouring.

It was an easy way to achive the look but I also believe its may be a good starting point to really learn this technique.

If you missed my YOUTUBE from last week, also using stamps from Colourific,  pop over HERE to watch it.

And dont forget to come and visit us in the Colourific FACEBOOK GROUP. We have a monthly "Anything goes" (open to all stamps) challenge with a prize donated form Colourific.

And that is all from me for today.
Thank you for popping by and for any comments left behind.
Don't forget to come visit me on FaceBook, Twitter, Instagram, Pinterest, Youtube or my FB page.
 Happy Crafting


Wednesday, 18 September 2019

Mixed media card - Colourific Inspiration

Hello Bloggers
and welcome to my blog.
Its once again Wednesday and my turn to share some  inspiration using the amazing stamps from Colourific.  Ive used a selection of stamps for the mixed media card Ive made for today. You can find them all in the STORE.


I started by adding distress ink to my background. I used water colour card stock to make sure it could take enough water to make the colours blend.

I used Archival black ink to stamp strait onto my background. I used the A6 Borders and Stems and the A6 Grunge background.

I stamped the butterfly and the sentiment from the A5 Butterflies take flight set on to scrap watercolour card stock and also used distress ink to colour, but this time i used a homemade silver mist spray as my water. This has given the sentiment and the butterfly a bit of sparkle.

I cut out the butterfly and added to my card base using foam tape.
The sentiment I cut into single words and added scattered around the card.

This is such an easy way to make a mixed media look to a card and can be done using any stamps you have in your stash.

And that is all from me for today.
Thank you for popping by and for any comments left behind.
Don't forget to come visit me on FaceBook, Twitter, Instagram, Pinterest, Youtube or my FB page.
 Happy Crafting


Wednesday, 11 September 2019

Tiny Hearts - Colourific Inspiration

Hello Bloggers
and welcome to my blog.
Its my turn to share a bit of inspiration using the amazing stamps from Colourific. 
 You can find the stamp I've used and all the other fantastic stamps in the
STORE.

I have 3 cards to share today but they are all variations of the same ideas and I use just the 1 background stamp.
This is a technique you can do with any background stamp and with a bit of fiddling around with your inks, use any stamp you have.


These cards all started out as simple stamping on my card stock with my Tiny Hearts Background stamp. The gradient in the colours are made by overlapping the inks. I used Distress ink for all 3 cards and if you start with the lighter colour on your stamp they wont really contaminate each other.

After stamping I cut 2 of the backgrounds into strips and added them to my card with foam tape to give them a lift. Use regular tape if you don't want the extra bulk.

I finished with a couple of die cut sentiments and a few black gems..

And that is all from me for today.
Thank you for popping by and for any comments left behind.
Don't forget to come visit me on FaceBook, Twitter, Instagram, Pinterest, Youtube or my FB page.
 Happy Crafting


Wednesday, 4 September 2019

Girls night out..

Hello Bloggers
and welcome

Its once again my turn to share some inspiration using the fantastic stamps from
 Colourific. 
 You can find the stamps I've used and all the other fantastic stamps in the
STORE. For todays post me and my little girl had a play session together.
We both used the A5 - Girls Night Out stamp set.


Sticking to what I do best, both Abbie and I simply stamped, coloured and added a sentiment.
I stamped using distress oxide and Abbie stamped with black ink and coloured with gel pens. We both finished with a die cut greeting and a few gems.
And that is it from me for today.
Thank you for popping by and for any comments left behind.
Don't forget to come visit me on FaceBook, Twitter, Instagram, Pinterest, Youtube or my FB page.
 Happy Crafting

Wednesday, 28 August 2019

Christmas is coming - Colourific Inspiration

Hello Bloggers
and welcome to my blog

It's once again wednesday and my turn to share some inspiration for Colourific.
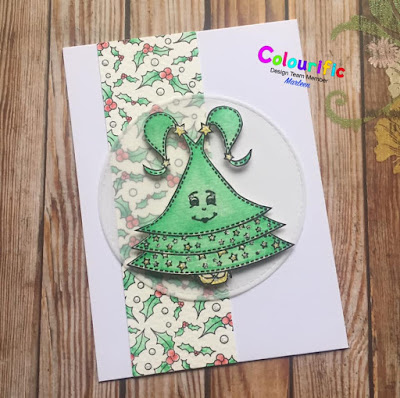
For today I have a couple of christmas cards to share using a few of the christmas stamps. Its never too early to start the christmas cards is it? lol You can find the stamps I've used and all the other fantastic stamps in the STORE.
For my cards today, I have used the following:
A6 -Holly & Berries Background
A6 - Xmas text Background
A5 Stitched Friends


Both cards has been made the same way. I started by stanping the background strips with the background stamps. The red one is coloured with distress oxide "mop up" and the green one was coloured with water colour pencils. Both of my stiched friends was stamped, coloured and fuzzy cut before being added on top of a die cut circle from vellum.

And that is pretty much it.. If you wanted to take this card to the next level, you could finish it with a few gems and even a greeting but I tend to keep my christmas cards extra simple.

And that is it from me for today.
Thank you for popping by and for any comments left behind.
Don't forget to come visit me on FaceBook, Twitter, Instagram, Pinterest, Youtube or my FB page.
 Happy Crafting

Wednesday, 21 August 2019

A bottle of love.. Colourific Inspiration.

Hello Bloggers
and welcome to my blog

Todays post is another tag. Im really enjoy crafting on tags and they can be used for so many things.
As per usual, I have used a selection of stamps from Colourific and you can find them all in the STORE.

The specific one I used for this tag is:
A6 - Grunge Background
A6 - Borders & Stems

A5 - Champagne & Cocktails


I used a tag cut from canvas paper, I really like working on this surface due to the way it takes the ink but also for the texture. I started by stamping my bottle with Archival (waterprrof) ink.

I then used Distress Stains and water to create my background. If you have ever used Distress products you will know that once you add water, the ink has a mind of its own lol, so there is no way to ever recreate a background fully.

Once I liked my background I stamped the details with Distress Oxide Inks.
I kept my stamp on the backing card as I stamped. Added a bit of ink and simply rolled the stamp over the corner of my tag. I find that not using a stamp block give a softer egde to the stamping.

I then took a bit of distress ink and coloured my bottle. It was already green from the background ink but I wanted it to pop a little bit.

To finish, I stamped the little details of the bottle on to scrap card and coloured with gold Distress Stain and oce dry, fuzzy cut and glued on top of the bottle. I added a few gems and Voila.. all done.

Oh before I go.. I just wanna mention our FaceBook group. Colourific now has a group for anyone who is interested in the products. There is a competition over there and the Desgin Team shares their projects every day. And we would love to see your Colourific creations too. Come and join us.


And that is it from me for today.
Thank you for popping by and for any comments left behind.
Don't forget to come visit me on FaceBook, Twitter, Instagram, Pinterest, Youtube or my FB page.
 Happy Crafting


Wednesday, 14 August 2019

Im late im late for a very important date...

Hey everyone
And welcome..

My apologies, I'm late with today's post.. I had it all planned and yet it totally slipped my mind..
But hopefully better late than never.

I'm very excited for this post as it wasn't just me crafting. Me and my youngest daughter had a play together with her favourite Colourfic stamp. Abbie is 9 so I guess its no surprise that the unicorn is her favourite lol..

We both used the A6-flying unicorn set and I also used the A6-unicorn text set as well as the A6-Tiny hearts background stamp.

You can fins all the stamps in the STORE.


Abbie simply stamped and coloured hers with gel pens.
Me, I stamped my unicorn on to watercolour card stock and used distress ink (well watered down) to colour. My background is stamped and heat embossed with a iridescent powder. I then simply layered my background onto the card blank, stamped my greeting and finished with a few gems..

And that is it from me for today.
Thank you for popping by and for any comments left behind.
Don't forget to come visit me on FaceBook, Twitter, Instagram, Pinterest, Youtube or my FB page.
 Happy Crafting